
If you’ve driven any car or truck produced since about 1988, you have experience with electronic fuel injection. Vehicles built before that had carburetors, which were fine as far as they went. Still, at best, they’re imprecise and prone to coming out of adjustment, meaning that their efficiency and reliability are always in question. For vintage car owners, a carburetor has been a necessary evil, but several manufacturers, including carb giant Holley, now offer bolt-on fuel injection retrofit kits for vintage vehicles, and it’s hard to think of a reason not to install one. We did it on a 1966 Jeep CJ5, which transformed the driving experience.
Carburetor vs. Fuel Injection
Both carburetors and fuel injectors do the same job: They mix fuel and air in a specific ratio and feed that atomized mixture to the combustion chambers.
Carburetors can come in different varieties, most notably in the number of venturis or “barrels” the carburetors have. Basic motors from your lawnmower’s, all the way up to V-8 engines, often had one-barrel carburetors. A step above that is a two-barrel carburetor, which doubles the number of venturis and helps to smooth out the flow of air-fuel mixture into the combustion chambers. A four-barrel carburetor essentially has a primary two-barrel system and a secondary system that opens only when the engine increases in RPM. That secondary channel can be operated mechanically by opening at a certain point in the throttle position or by vacuum, where the buildup of engine vacuum triggers the secondaries to open.
Other combinations of carburetors exist, like the Chevrolet Corvair, which was available with four one-barrel carburetors (two primaries and two mechanical secondaries), or Pontiac’s Tri-Power setup, with three two barrels all operating as primaries.
Fuel injection is more efficient and reliable. Rather than dumping large quantities of fuel and air into the system, it more precisely measures just how much fuel the engine is calling for. Early fuel injection systems like Rochester’s mechanical fuel injection system were complicated and less efficient. Still, since the 1970s, electronic fuel injection has precisely measured how much fuel and air is required.

Electronic fuel injection can be split into two types: Throttle body fuel injection and multi-port fuel injection. In each system, a sensor mounted in the exhaust channel measures the amount of fuel that the engine is burning, and the electronic control unit (ECU) triggers a fuel injector to deliver a precise amount of air/fuel mixture.
A throttle body system essentially replaces the carburetor on the intake manifold. Most throttle body systems have two injectors in a housing that looks similar to a carburetor. It bolts to the top of the intake manifold, and the air/fuel mixture flows through the intake runners to the individual cylinders.
With multiport fuel injection, the injectors are mounted directly to each cylinder, only delivering fuel when the engine timing is on its intake stroke for that cylinder. It’s a much more efficient setup, and it’s what all of us have been driving for the last quarter century.
How does Holley Sniper EFI work?
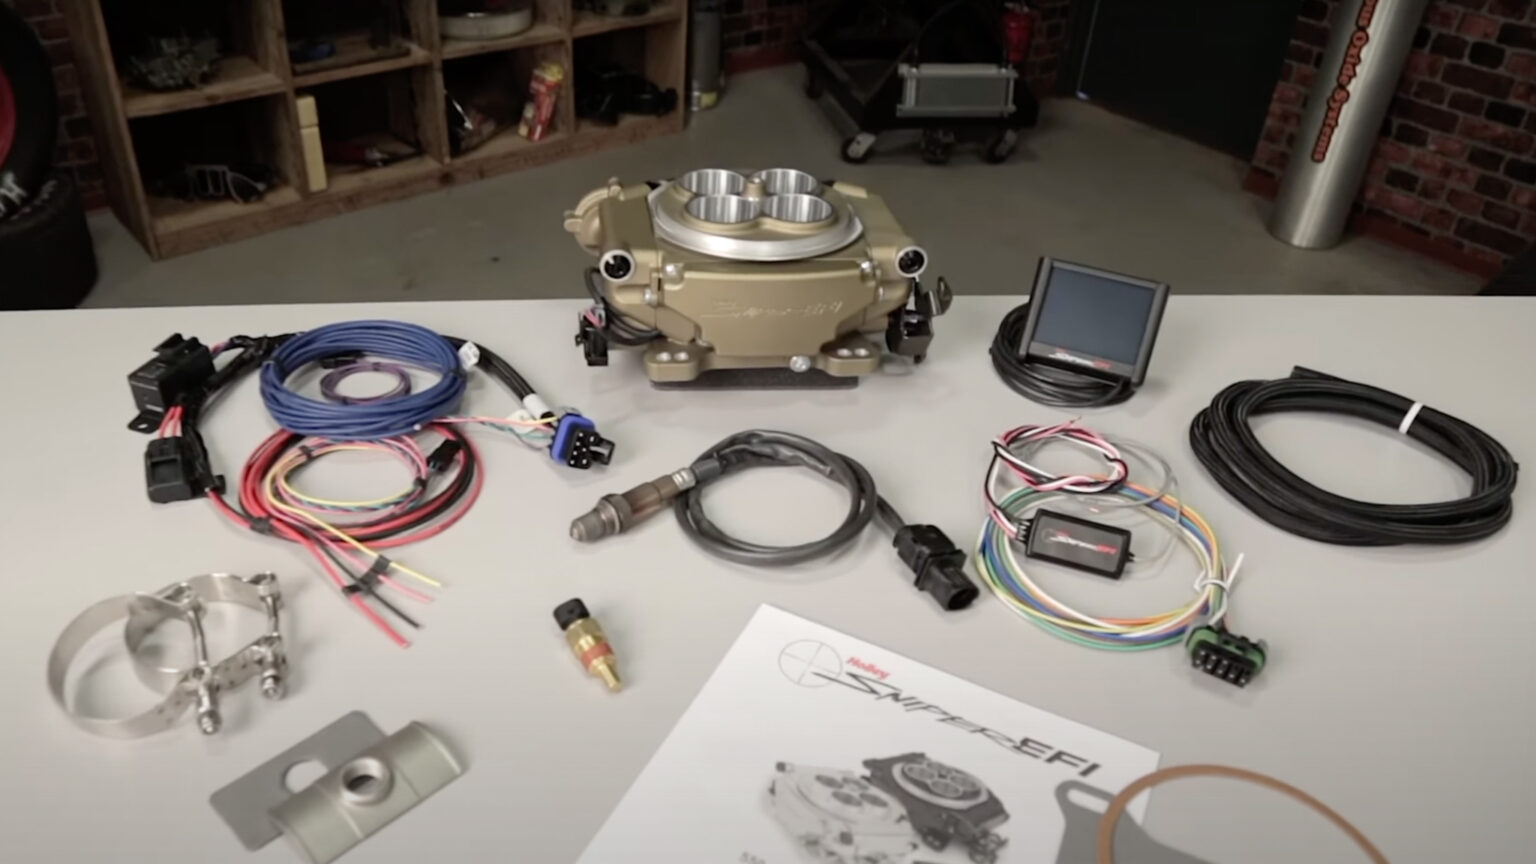
The Holley Sniper system is a throttle body fuel injection system. While multiport is more efficient, it’s also significantly more complex, and it isn’t easy to retrofit to an older engine. Holley Sniper EFI is. As essentially a copy of GM’s throttle body setup, Holley Sniper simply bolts on where a carburetor used to be.
Other similar systems exist from companies like Howell Engineering, but the Holley Sniper EFI system has a few advantages. First, it’s a pretty simple kit with explicit instructions, making it easy for people like us to work with. You don’t need an engineering degree to install and use it. You follow the directions. Second, systems like the Howell setup have tuning that requires a laptop. Holley Sniper EFI has an included LCD panel that you can mount anywhere, allowing you to make adjustments on the fly.
The system has a built-in ECU and all the wiring required to go from a simple, straightforward install to a much more complicated installation that can run electric fans, A/C kickdowns, and more.
The final benefit is that Holley Sniper EFI is designed to work with Holley’s Hyperspark distributors. While it’s true that you can use Holley Sniper EFI even with an old-school points distributor, teaming it with one of these HEI electronic ignition distributors means that the Sniper can control precise fuel delivery and engine timing as well.
How to Install Holley Sniper EFI
I installed a Holley Sniper EFI system on a 1966 Jeep CJ-5. For most common installations (think Chevrolet 350 or Ford 5.0-liter), we’d recommend also installing the Hyperspark distributor, but there wasn’t one available for my Jeep. I did opt for an HEI-style electronic ignition distributor, but it’s a generic brand, and I can’t control the engine timing through the Sniper EFI.
Installing the actual EFI unit is a piece of cake. With four bolts, the carburetor comes off, and the Sniper EFI bolts in its place. We had to cut and weld the throttle rod in our application, but most cars will use a throttle cable, making the hookup a lot easier.
Carburetors don’t require a lot of fuel pressure, so mechanical fuel pumps were the norm. Fuel injection requires much higher fuel pressure, so we opted for an in-tank retrofit electric fuel pump from Holley. We had to upgrade the rubber fuel lines to high-pressure lines and wire the fuel pump, but it wires directly to the Sniper’s wiring harness. Everything is clearly marked and labeled.
The Sniper has two wiring harnesses: the main harness used in all applications and a secondary harness that controls things like electric fans, A/C kickdowns, and other accessories. We didn’t have any of those accessories on our installation, so we kept the secondary wiring harness in, coiled the wire it plugs into, and ziptied it to the firewall.
The main harness has:
- A 12-volt connection directly to the battery, which contains a pre-installed fuse
- A ground connection directly to the battery
- A connection to our new fuel pump with a pre-installed relay
- A connection to keyed switched power
- A connection to the coil for a tach signal
Your author has constantly struggled with automotive wiring, but I took the time to make these connections as secure as possible, using weather-sealed butt connectors and heat shrink tubing. All of the connections were easy to make, following Holley’s excellent instructions and accompanying videos. The entire wiring job took me maybe two hours, mostly because I triple-checked everything I did.
The only area where I really needed help from BDR Automotive – which graciously loaned me garage space to perform the install – was welding a bung for an O2 sensor in the exhaust system. The Sniper EFI kit includes an O2 bracket that clamps around the exhaust, but from everything we’ve read, don’t use it. It’s almost guaranteed to leak. I drilled the hole for the bung using a step drill, and BDR Automotive welded the bung in place for me.
How to First Start a Holley Sniper EFI
With the wiring and plumbing complete, I was ready to fire it up for the first time. Again, it’s essential to follow the directions. The control panel has a Startup Wizard that asks for information like the engine displacement, target RPM, and whether or not you’re controlling timing with a Hyperspark distributor.
With the Startup Wizard complete, you’re ready to run. Turn the key, and the engine should fire up immediately. Like a carburetor with an electric choke, Sniper EFI will increase the amount of fuel in the mixture when the engine is cold, but it’s so much more precise than a carburetor with a choke. The system monitors engine temperature using a coolant temp sensor and progressively cuts back the fuel in the mixture as the engine warms. As the engine warms up, you’ll hear the Idle Air Control (IAC) valve pulsing and metering.
The LCD panel inside the vehicle replaces a whole dashboard full of gauges. You can customize the screen, but the basic screen has a tachometer, a coolant temperature gauge, the IAC percentage, battery voltage, fuel pressure, and more. Holley offers more elaborate screens that replicate a conventional dashboard, but the included screen is relatively discrete in a vintage vehicle like my Jeep.
There was some specific work I had to do to my system because I’m running it on a really weird engine. Without going into an hour-long dissertation, the odd-fire Dauntless V-6 that came in the CJ-5 from 1966 to 1972 has poles on the distributor that are not evenly spaced the way they would be on a V-8. That means that my Idle Air Control valve was receiving irregular pulses from the tach output on the distributor and was hunting for an idle. It took me a little while to figure out, but I bought a Holley crank position sensor, triggered with three bolt heads evenly spaced through existing holes on the harmonic balancer. It allowed for a consistent, regular tach signal and smoothed the idle out perfectly.
I’ve been running the system for about four months now, and I couldn’t be happier. All the bogging and uneven idle I was experiencing with a carb is gone. The engine fires up instantly every time, and now that I’ve tuned it and set the idle correctly, it’s amazingly reliable.
If you’re driving a vintage car and are interested in the benefits of fuel injection, the Holley Sniper EFI system is easy to install and use and packaged relatively affordably. It’s been a great way to get the most out of my vintage Jeep.
NOTE: We paid full retail for the Holley Sniper EFI kit, the fuel pump, a new fuel tank, and all the associated hardware. BDR Automotive provided space for the install, plus plenty of expert advice along the way. We paid the shop for the 02 bung welding and a few hours for miscellaneous help.