
Your Test Driver is supported by its readers. When you buy something from a link on our site, we may earn a commission.
New to Your Test Driver? Check out our new car reviews, product recommendations, and cool features. Want to see something else? Let us know!
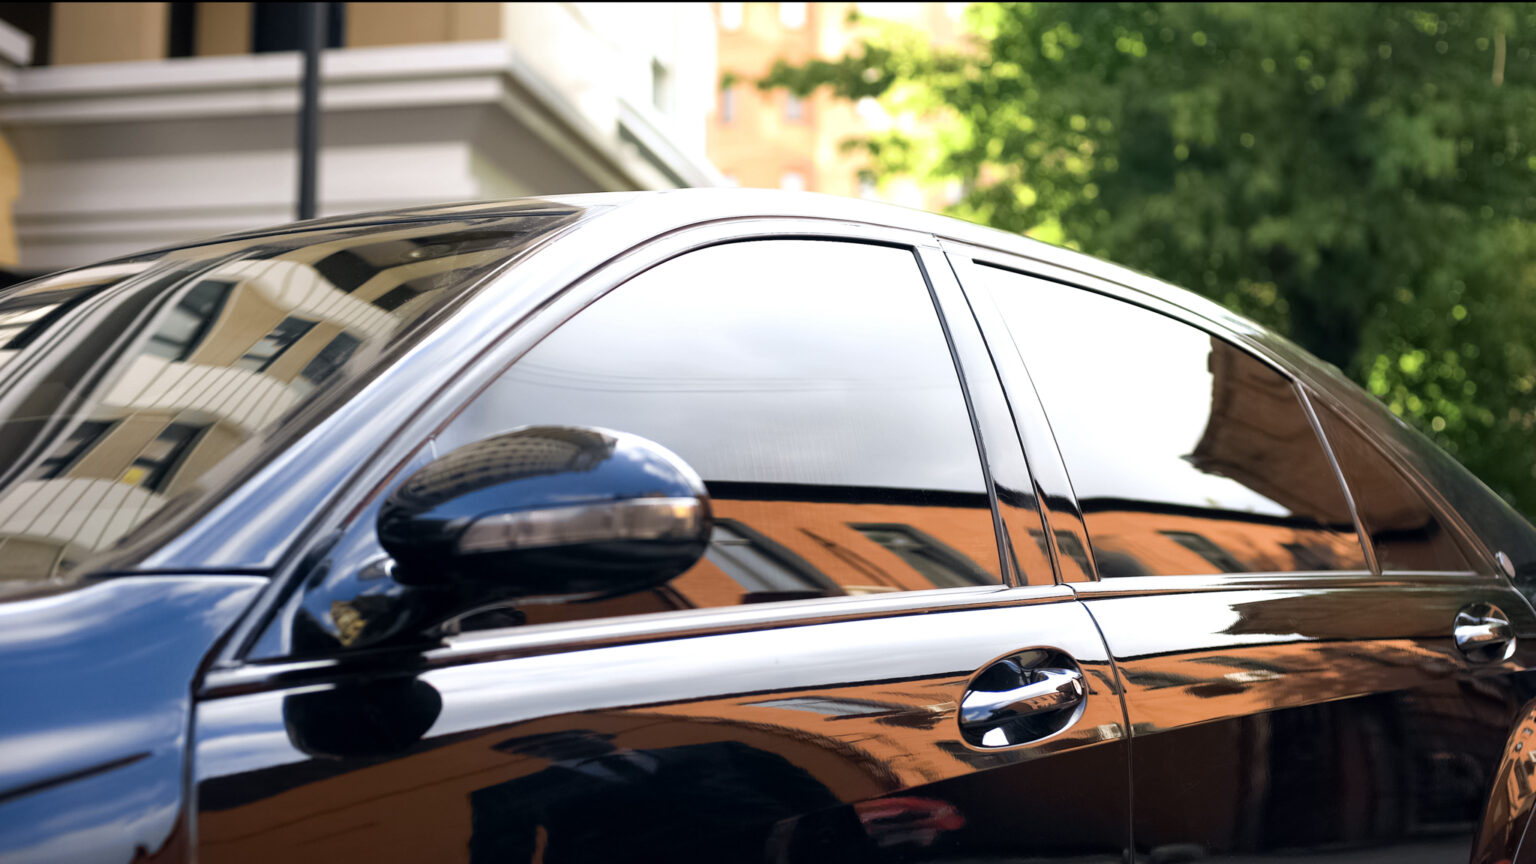
Window tint is something that most people will choose a professional to apply, but it’s a skill that anyone can learn at home. Tint is cheap enough that you can experiment with it a bit without a major investment in materials.
Choosing a Window Tint
The biggest thing to be aware of is the law in your state regarding window tint. If you apply a tint that’s too dark, you risk getting pulled over or failing a safety inspection if that applies in your state.
We like 3M Color Stable window tint. It’s not the cheapest, but 3M is the undisputed king of tint film. It’ll last longer than the stuff you find at the auto parts store, and it’s exactly what the pros use when they apply it.
3M Color Stable Series is our recommendation to get your home tint job started down the right path. That said, if you’re experimenting for the first time, grab the cheapest stuff you can find and practice with it. It’s easy enough to remove when it’s wet, so don’t worry so much about making mistakes.

Tools and Supplies Required
Along with the window tint, you’re going to need a handful of tools and supplies:
- Sprayway Glass Cleaner
- Blue Max Squeegee with Handle
- Olfa Stainless Steel razor knife
- Sharpie
- Scotchbrite pad
- Straightedge
- Razor Blades
- Microfiber towels
- Old debit card, credit card or piece of flexible plastic
- Hair Dryer (or heat gun)
- Tape Measure
Prepping the Car
The first thing you want to do is clean the car really well inside and out. You want to eliminate the risk of trapping any contaminants between the tint film and the glass, so cleaning the french fries and dust off of the door panels is just as important as cleaning the glass.
Note that we’re also going to be using the outer door panel of the car as a sort of staging area. We’ll be laying the tint film against the door panel while we’re reapplying our soap and water solution to the windows, so be sure the outside of the car is spotless.
Note that all of the popular window tint films have a clear protective film on the side of the tint that will eventually touch the glass. You’ll remove that as the last step before you apply the film to the glass.

Finally, we’re applying the tint film to the INSIDE of the glass, but we’re cutting it to size and shrinking it with the hair dryer or heat gun on the OUTSIDE of the glass first, using gravity to our advantage.
We’re doing this in two steps, starting with the side glass and moving to the more challenging rear window.
SIDE WINDOWS
Step 1: Clean the outer window
We’re not talking about wiping the glass with the squeegee from the gas station. You need to intensely clean the inner surfaces of the glass with glass cleaner and carefully remove any imperfections from the inner surfaces with a razor blade.
Any dust or other foreign objects are going to be trapped between the glass and the window tint and cause air bubbles and all kinds of other problems.
Take the time to carefully clean the glass with a good quality, ammonia-free glass cleaner, use the razor blade to remove anything stuck in place, and wipe down with a clean microfiber towel
Step 2: Cut the window tint to size
We’re eventually going to be applying the tint to the INSIDE of the glass, but in order to easily get the tint cut properly to size, we’re going to be laying the tint on the glass, cutting it to size, and forming it to the glass on the OUTSIDE of the glass. That gives you a piece that you can easily remove from the outside and transfer to the inside of the window
With your window tint unrolled, cut a piece roughly the size of the glass you’re covering, but with about three inches to spare all the way around. Spray the OUTSIDE of the window with your soap and water solution. Lay the roughly cut piece of tint film on the outside of the glass
Cut the window tint with the Olfa blade, and shape it roughly to the the shape of the windows. You can roughly approximate the size of the piece you’re going to cut by laying the tint on the outside of the window.

Using the old debit card, begin by tucking the tint into the window felt slightly, and cut the film using the window felt as a guide. Be careful not to cut the window felt or gasket. Just slowly run the point of the blade around the window with the tint tucked in place. The corners of the glass will be challenging to cut while the film is in place. A better method is to trace a guide line in the corners using a Sharpie, then removing the tint, laying it against the glass so it’s easy to make your cut, and cut the window tint along the Sharpie line.
Once you’ve got your window tint cut to the correct size and shape, remove it from the outside of the glass, and spray your outer door panel with the soap and water solution. You can then lay the window tint on it while you’re preparing for the next step.
Step 3: Shrinking and Shaping the Tint
The next step is to use the heat gun or hair dryer to shape the tint to the curve of the window.
Spray the window with the soapy water solution. Remove the window tint from the door panel and – leaving about three inches between the bottom of the tint and the bottom edge of the glass – lay it against the wet glass. Use the squeegee to work any soapy water out from under the tint film, pushing water and air bubbles down toward the bottom edge of the film.

Use the hair dryer to carefully heat the window film, while using the squeegee to ensure that the film has no gaps or bubbles near the edge. This stretches and shapes the film to conform to the window’s curvature. Don’t stop moving the hair dryer. You really just want to warm the film, and not get it too hot.
Once you’re satisfied with the way the film curves against the glass, remove it and repeat the process on the top edge. Lay the film about three inches lower than the edge of the glass, use the squeegee to push air bubbles and water UP to the top edge of the film, and use the hair dryer to shape the tint to fit.
Step 4: clean the inside of the glass
Same process as we used outside, but this time, in addition to using the razor blade to clean any tough-to-remove spots, you’re going to also use the Scotchbrite pad to clean it even further. Finally, spray it down again with your glass cleaner and wipe the glass completely with a microfiber towel.
Step 5: Apply the Window Film
Once you’re satisfied that the window is completely clean inside, you’re ready to apply the film.
Spray both the inside and the outside of the window thoroughly with your soap and water solution. Again, we’re going to be using the outside of the window as something of a staging area to work on the tint film before we apply it inside.
Lay the cut and shaped window tint on the OUTSIDE of the window. Separate the clear protective liner from the film, but don’t remove it entirely. Leave a strip along the bottom edge of the film about four inches wide.
Roll the window down about an inch. Remove the prepared film from the outside of the window, and walk it around to the inside of the glass. Make sure your inside glass is soaked with your soapy water solution, and lay the tint film against the inside of the glass, aligning the top edge of the film with the edge of the glass.
Because your window is rolled down a bit, you’ll have a few inches of film and liner that are hanging over the inner door panel. We’ll address this after you’ve squeegeed most of the bubbles out and rolled the window fully up.
The soapy water allows for some movement, so be sure that it’s where you want it before you start squeegeeing the bubbles out. Push all of the air bubbles out from between the tint and the glass using your squeegee, working from the center to the outside edges.
Roll the window fully up. Lift the remaining tint and protective liner to expose the bottom edge of the glass, and respray it with your soapy water solution. Carefully remove the remaining liner from the bottom edge of the tint film. Lay the remaining edge of tint film against the glass, lift it slightly to again reapply your soapy water to the glass.
At this point, you want to insert the bottom edge of the film between the glass and the door panel edge gasket that rides against the glass when you raise and lower the window. The best tool for this is your old debit card. With the tint and glass sprayed down, insert the debit card between the gasket and the tint film, carefully tucking the entire edge between the gasket and the glass. Be careful not the wrinkle the film, but gently guide it between the glass and the gasket.
Squeegee the remaining air bubbles out, from the center to the edges of the glass. Finally, use your debit card to go around the entire perimeter of the glass, ensuring that there are no edges of the tint film that have lifted off of the glass.
REAR WINDOW
The side windows are relatively easy to apply. The challenging part is the rear window, where gravity is going to be working against you.
A couple of notes about preparation: If you’re working on an SUV where the glass is bolted to hinges, it’s probably easier to just remove the glass entirely and set it on a table protected by towels. If there’s a third brake light in the way on the rear package shelf, you might want to remove it just to get it out of your way. Finally, if the connections for rear window defrosters are in the way, it may be to your advantage to temporarily disconnect them.

In general, the steps up to the final installation on the inside of the glass are exactly the same as they are for the side windows. You’re going to cut the film to size the same way and shrink and shape it with the heat gun in the same fashion.
The difference is going to be how you apply it to the inside of the window. We’ll be using the “reverse roll” technique, but there are other techniques you may find more helpful.
Step 1: Protect the Package Shelf
Lay several towels on the rear package shelf, draping down over the headrests of the rear seats. If the headrests are removable, or if they lower out of the way via a button on the dash, lower them as much as possible.
Step 2: Roll Film
With the window tint cut to size and shrunk with the hair dryer or heat gun, begin by separating the protective liner from one-half of the tint. Spray soapy water on the film, and lay the protective film back onto the tint film. This will make it easier to remove when the film is in place. Repeat the process with the other half of the film.
Beginning with the left edge of the film, roll the film tightly back onto itself. You should have a roll of film about an inch in diameter.

Step 3: Apply the Film
This step is a WHOLE lot easier with two people, so plan ahead before you get started.
Bring the roll inside the car, and unroll it on the towels you laid on the package shelf so that the protective film faces the inside of the glass. That ensures that you’ve oriented the film correctly.
Remove the protective film entirely from the tint. Spray the inside of the glass and the inside of the window film thoroughly so that there are no dry spots in either surface. With your helper, slide your hands and arms under the film on the package shelf, and carefully raise it to meet the glass, roughly where you want it to be. Thanks to the water and soap sprayed on both surfaces, you have some wiggle room to move it around.
Using your palm against the window film, you can push and slide the film around on the glass until it’s located where you want it. It’s most helpful to push the tint to the correct location on the bottom edge of the glass and then work your way up from there.
Step 4: Squeegee the Bubbles Out
Similar to the side windows, use your squeegee to work any air bubbles out, from the middle of the glass out to the edges. Because most rear windows have heating elements, pay careful attention to any air bubbles trapped between the film and the heating lines in the glass. The film will be permanently attached to the glass, and you’ll enjoy a much cooler ride inside and a much cooler ride from the outside, too.